If you’re new to WordPress, publishing your first blog post can be a bit overwhelming. But fear not! In this guide, we’ll walk you through the steps of publishing your first post on WordPress, step by step.
Step 1: Log in to Your WordPress Dashboard
To publish a blog post on WordPress, you first need to log in to your WordPress dashboard. This is where you’ll find all the tools you need to create and manage your blog posts. To access your dashboard, go to your WordPress login page (yoursite.com/admin), enter your credentials, and click on the “Login” button.
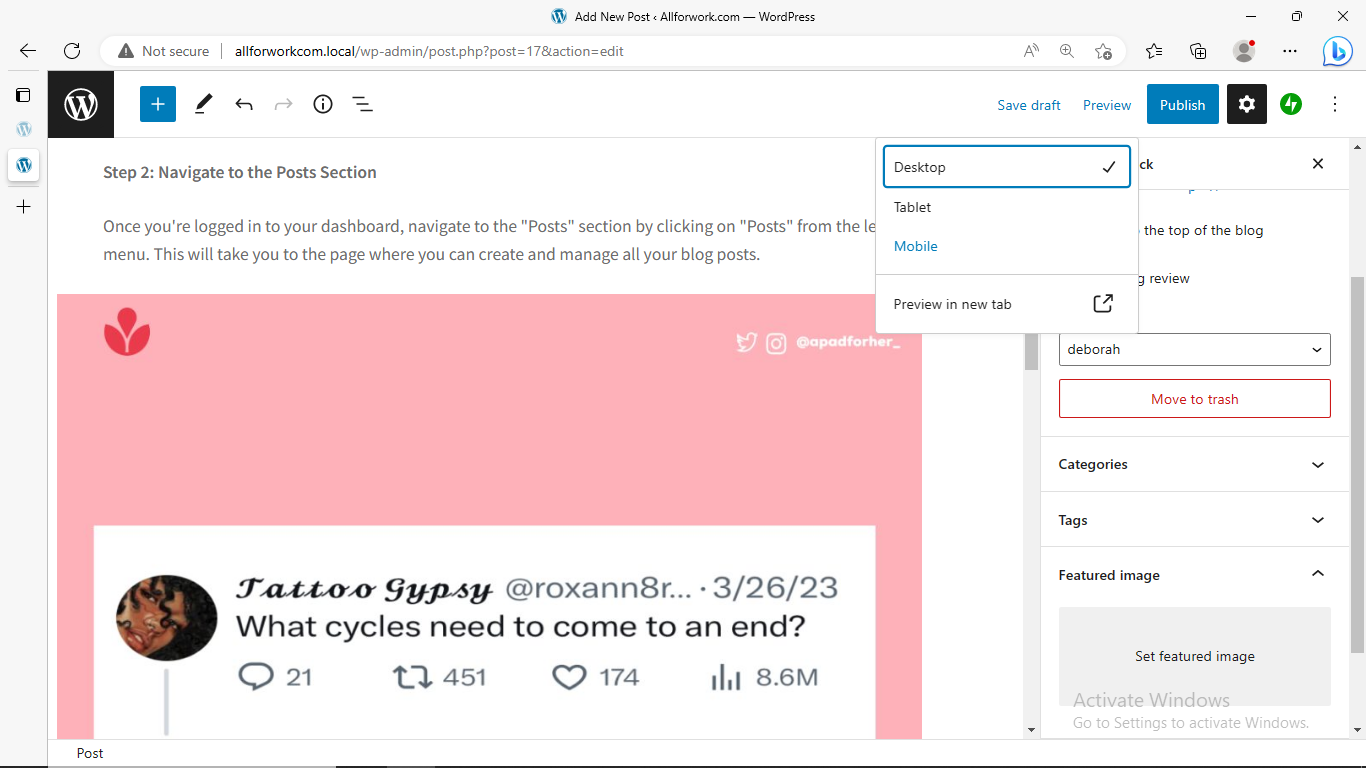
Step 2: Navigate to the Posts Section
Once you’re logged in to your dashboard, navigate to the “Posts” section by clicking on “Posts” from the left-hand menu. This will take you to the page where you can create and manage all your blog posts.
Step 3: Click on “Add New”
To create a new blog post, click on the “Add New” button. This will take you to the post editor, where you can start creating your content.
Step 4: Add Your Content
Now it’s time to add your content. Start by adding a title for your post in the title field. Then, use the post editor to add your text, images, videos, or other media. You can also format your content using the formatting options available in the editor. You also want to ensure that your content is optimized for SEO. Don’t know how to do that? Check out our Beginner’s Guide to SEO, and download the Yoast plugin to get started.

Step 5: Add Categories and Tags and Featured Image.
Once you’ve added your content, it’s time to add categories and tags to your post. Categories and tags help organize your content and make it easier for your readers to find what they’re looking for. You can add categories and tags by selecting them from the options available in the right-hand sidebar of the post editor.

Similarly, a featured image refers to images that appear when you share your post to other social media sites. It gives your post a visual representation and drives clicks.
Step 6: Preview Your Post
Before you publish your post, it’s always a good idea to preview it to see how it will look on your website. To do this, click on the “Preview” button at the top of the post editor. This will open a preview of your post in a new tab.
Step 7: Publish Your Post
Once you’re happy with your post, it’s time to publish it. To publish your post, click on the “Publish” button at the top of the post editor. Your post will now be live on your website for your readers to see.

If you’re not ready to publish, you can always save your draft and come back to it later. Remember, it doesn’t have to be perfect, go out there and share your ideas with the world.
Congratulations! You’ve just published your first blog post on WordPress. With these simple steps, you can create and publish high-quality content that engages your readers and helps you achieve your blogging goals.

Deborah Oludimu is an experienced content writer with 3+ years of experience. She is skilled in research, writing, and editing to produce high-quality, engaging content across industries. Deborah is passionate about creating content that informs and inspires
© 2025 GBEFUNWA.COM. All rights reserved.
The WordPress® trademarks are the intellectual property of the WordPress Foundation, and the Woo® and WooCommerce® trademarks are the intellectual property of WooCommerce, Inc. Uses of the WordPress®, Woo®, and WooCommerce® names in this website are for identification purposes only and do not imply an endorsement by WordPress Foundation or WooCommerce, Inc. gbefunwa is not endorsed or owned by, or affiliated with, the WordPress Foundation or WooCommerce, Inc.