The WordPress Customizer is a live theme customization tool with which you can preview changes to your website before publishing it. The feature kicked off with WordPress version 3.4 and has since become a staple of the WordPress platform. Without it, lots of us wouldn’t know what to do with our websites’ appearance and functionality, which, thanks to the Customizer, we can control from a single interface. And if by any chance, you aren’t yet employing the Customizer in your WordPress backend, this article will show you exactly how to use the WordPress Customizer.
Because the Customizer allows you to make changes to various aspects of your website, including its layout, colors, fonts, and more, it makes for a convenient tool letting you personalize your website without having to dive headfirst into the deep end of coding and whatnot.
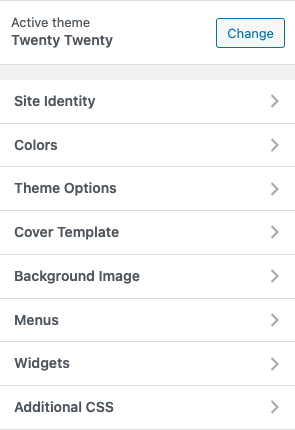
The WordPress Customizer is a feature that naturally comes with the WordPress site. To access your customizer, head over to the Appearance section of your WordPress dashboard, then choose Customize. It’ll lead you to a new tab, from where you’ll see a live preview of your website on the right side of the screen, and a list of customization options on the left. Whatever modifications you make will only have an effect on your activated theme.
Accordingly, you get to preview adjustments to your site and tweak various settings such as your site title, logo, color scheme, and more. WordPress Customizer instantly saves the changes you make, allowing you to see the impact of your modifications immediately. To save your changes and publish them, select the Publish button.
Even with inactive themes that have been installed on your site, you can still utilize the WordPress customizer to make adjustments and see a live preview before activating said theme. Just head to Appearance, then on to Themes to select the Live Preview button.
Of course, it doesn’t matter the exact theme you’re making use of, the WordPress customizer has its’ own default settings that come with it. For advanced themes and custom themes, their extra settings will also be included here, granting you extensive customization.
The first panel of the WordPress Customizer is the Site Identity panel and it’s where you can add a logo, site title, favicon, and tagline. You can also set the display options for the site title and tagline.
This is important because WordPress has defaults like “Just Another WordPress Site” for your site tagline. It’s best if you update it to something that more closely reflects the image you have in mind for your site. Or you could choose not to put anything there.
Editing this section is pretty much self-explanatory; click on “select logo” to upload your website’s logo and select “site icon” to add a favicon to your site.
Here are some things to keep in mind;
In the Colors section, you can adjust the colors of different site elements, such as the background color, text color, and link color. You can choose colors from a color palette or input your own hex code.
The specific options that are available to you will vary depending on just what WordPress theme you’re making use of. So while some themes may offer you the option to set a color scheme for the whole website, some will be more particular and allow you color options for various site elements such as the headers, body text, site background, and links.
There’s a hack though; you can now have custom color changes via the Block Editor since each block is equipped with individual color settings, allowing you to sidestep some of the restrictions that may come with your WordPress customizer. All you have to do is click on Color Settings for that block.
With the Menus panel, you can create, edit, and rearrange navigation menus on your website. The WordPress Customizer allows you to modify and manage your website’s menus, meaning you can:
By using the WordPress Customizer, you can easily manage and modify your website’s menus to create a customized and professional-looking site. Also, should you wish to include all future top-level pages you create in a particular menu, simply check the box that says Automatically Add New Top-Level Pages. That way, you save yourself the effort of doing it all over again whenever a top-level page is created.
Note that some page builders allow you to create custom menus for your website if you do not want to use the customizer.
The Widgets panel lets you add, remove, and rearrange widgets on your site. Note that widgets are small boxes displaying specific information that you can add to the sidebar or footer area of your website, examples are the search bar, recent posts, or even a calendar.
Depending on the theme you have in place, you can add widgets to different areas of your website (the sidebar or footer area). Other themes might have more varied location options. When you click on a location, the widgets there, if any, will become visible, allowing you to make the necessary changes.
Clicking the Add a Widget button will open a panel to show all the available widgets in the location you’ve selected. Choose one by clicking on it and make changes to the widgets as you like. Of course, you can easily change the widget’s location by dragging it to your desired position
Here’s the thing; WordPress has a default for your home page. This default includes displaying your most recent blog posts on your site’s homepage which might not be to your satisfaction. Especially if you prefer an actual landing page for your visitors.
The Homepage Settings panel lets you choose the display options for your homepage, switching between a static page or a dynamic blog feed. If you wish to choose a static page, click the A static page button. Then, you can select both the page that will be used as your homepage as well as another page for displaying your blog posts.
Clicking the Add New Page button will help you create a new page in a jiffy should you not have the necessary pages at hand.
Not every theme has a Content Options panel but many of the themes available on WordPress do. Should your theme fall into the second category, then the panel will help you exercise control over the way your content looks across your website.
With the Author Bio, you can choose whether to display a short bio on your blog posts while Blog Display determines if it’s an excerpt or the full post that is displayed. Featured Images help you set the images that will show on your pages and posts while Post Details tells WordPress what to display on a post, e.g, categories and tags.
The Additional CSS panel is for adding custom CSS code to your website. If you didn’t know, CSS is a styling language that allows you to change the appearance of your website. If you are familiar with CSS, you can use this panel to customize the style of your website. Some advanced WordPress users do this by inputting CSS code straight into the style.css file of their current child theme, doing this however requires having FTP access to your website host.
The most straightforward way to add CSS to your site would be to write your custom CSS code in the Additional CSS panel where you can view changes to your site before publishing. WordPress also aids your efforts here, displaying an error message for an improper CSS statement and suggesting attributes based on your letter input.
Once you have made all the changes you want, make sure to click the Save & Publish button. This will save your changes and make them live on your website.
The WordPress Customizer is a powerful tool that allows you to customize the appearance of your website literally without writing any code (except if you want to!). By following these steps, you can make the most of its features and create a website that looks exactly how you want it to. Whether you are a beginner or an experienced user, if you aren’t using the WordPress Customizer, you’re probably still going to have to do the same customizations, except in a less stress-free manner.
Are you ready to kickstart your WordPress project using the WordPress Customizer?

Deborah Oludimu is an experienced content writer with 3+ years of experience. She is skilled in research, writing, and editing to produce high-quality, engaging content across industries. Deborah is passionate about creating content that informs and inspires
© 2026 GBEFUNWA.COM. All rights reserved.
The WordPress® trademarks are the intellectual property of the WordPress Foundation, and the Woo® and WooCommerce® trademarks are the intellectual property of WooCommerce, Inc. Uses of the WordPress®, Woo®, and WooCommerce® names in this website are for identification purposes only and do not imply an endorsement by WordPress Foundation or WooCommerce, Inc. gbefunwa is not endorsed or owned by, or affiliated with, the WordPress Foundation or WooCommerce, Inc.